DIY
DIY project or fixes
- AKG K512 Repair - Speaker unit replacement
- シャープ Sharp KI-GS50 / KI-GS70 加湿空気清浄機分解清掃 Cleaning DIY
- 清酒の醸造 (Sake) - EC1118
AKG K512 Repair - Speaker unit replacement
Parts and Tools required
- 32ohm 40mm speaker unit
- Soldering iron
- Screwdriver
Reference
シャープ Sharp KI-GS50 / KI-GS70 加湿空気清浄機分解清掃 Cleaning DIY
This is a Japan model of Sharp air purifier therefore I am including a machine translated Japanese guide to disassemble it.
Warning: This is not a complete guide to include every step, this is a note to remind myself the important steps and you may take it as reference if you would like to clean your air purifier by yourself. (Don't break it)
これはシャープの空気清浄機の日本モデルなので、機械翻訳された日本語の分解ガイドをお付けします。
警告 これは重要なステップを自分自身に思い出させるためのメモであり、自分で空気清浄機を掃除したい場合に参考にしてください。(壊さないでください)
Steps
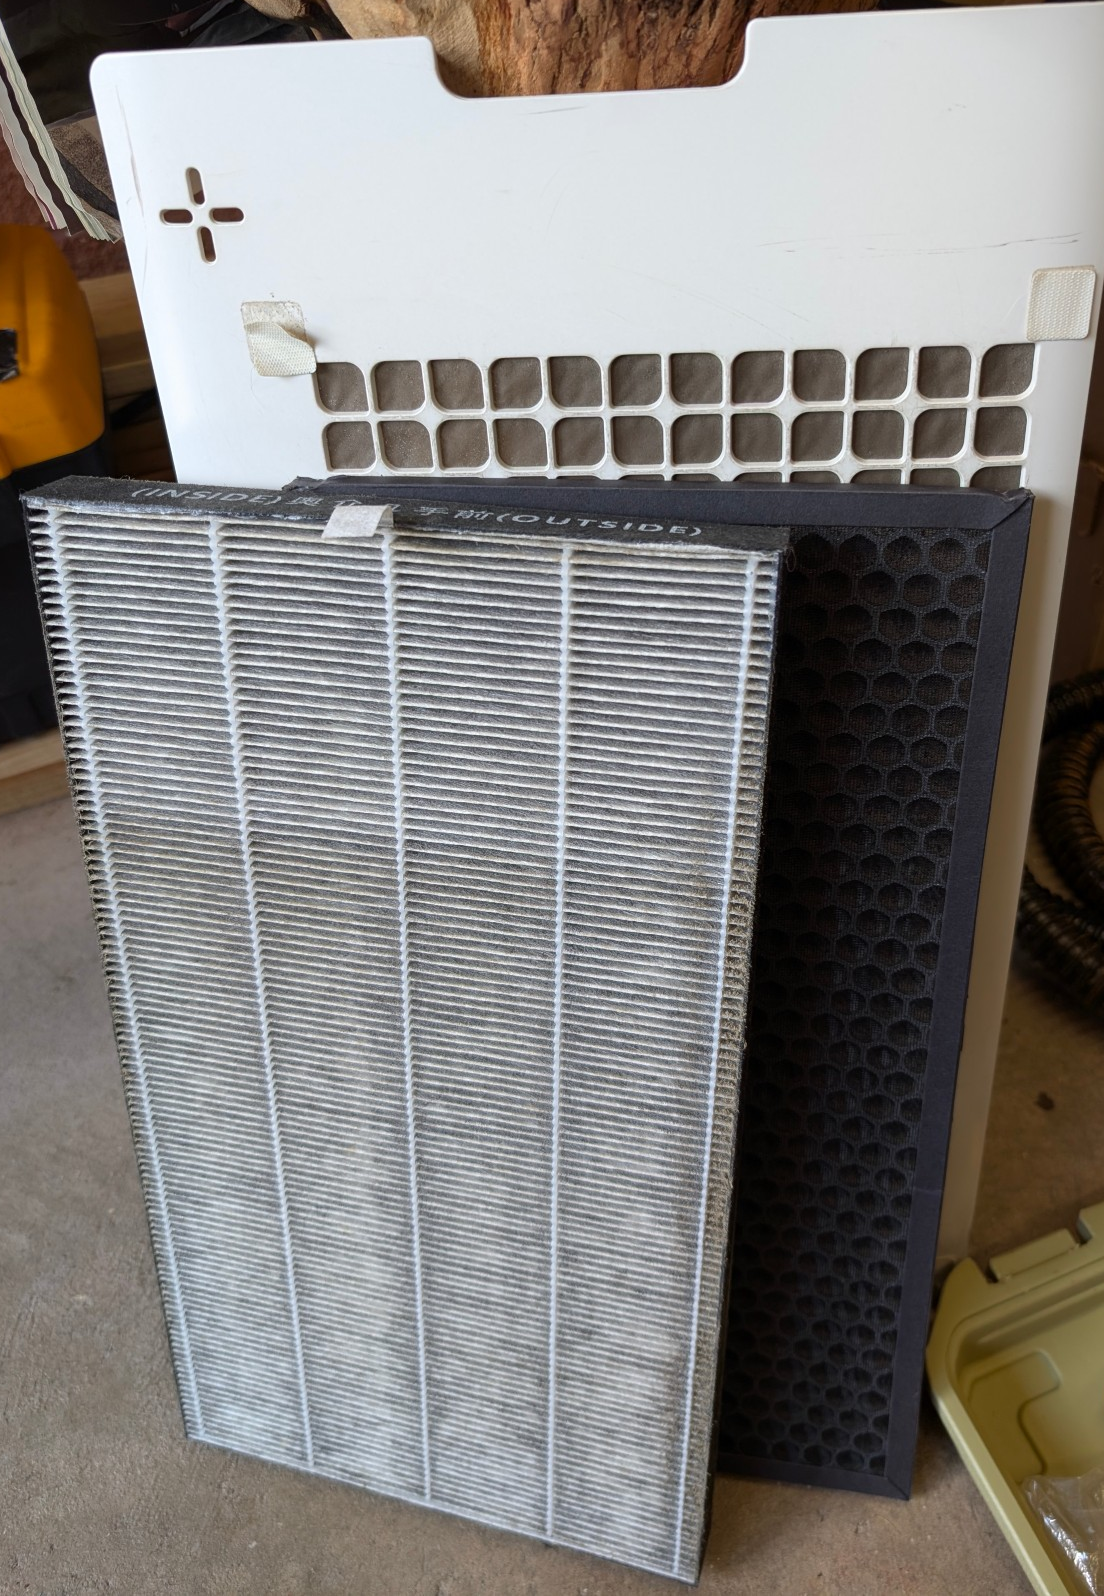
- Open the back cover and remove the filters
裏蓋を開け、フィルターを取り外す

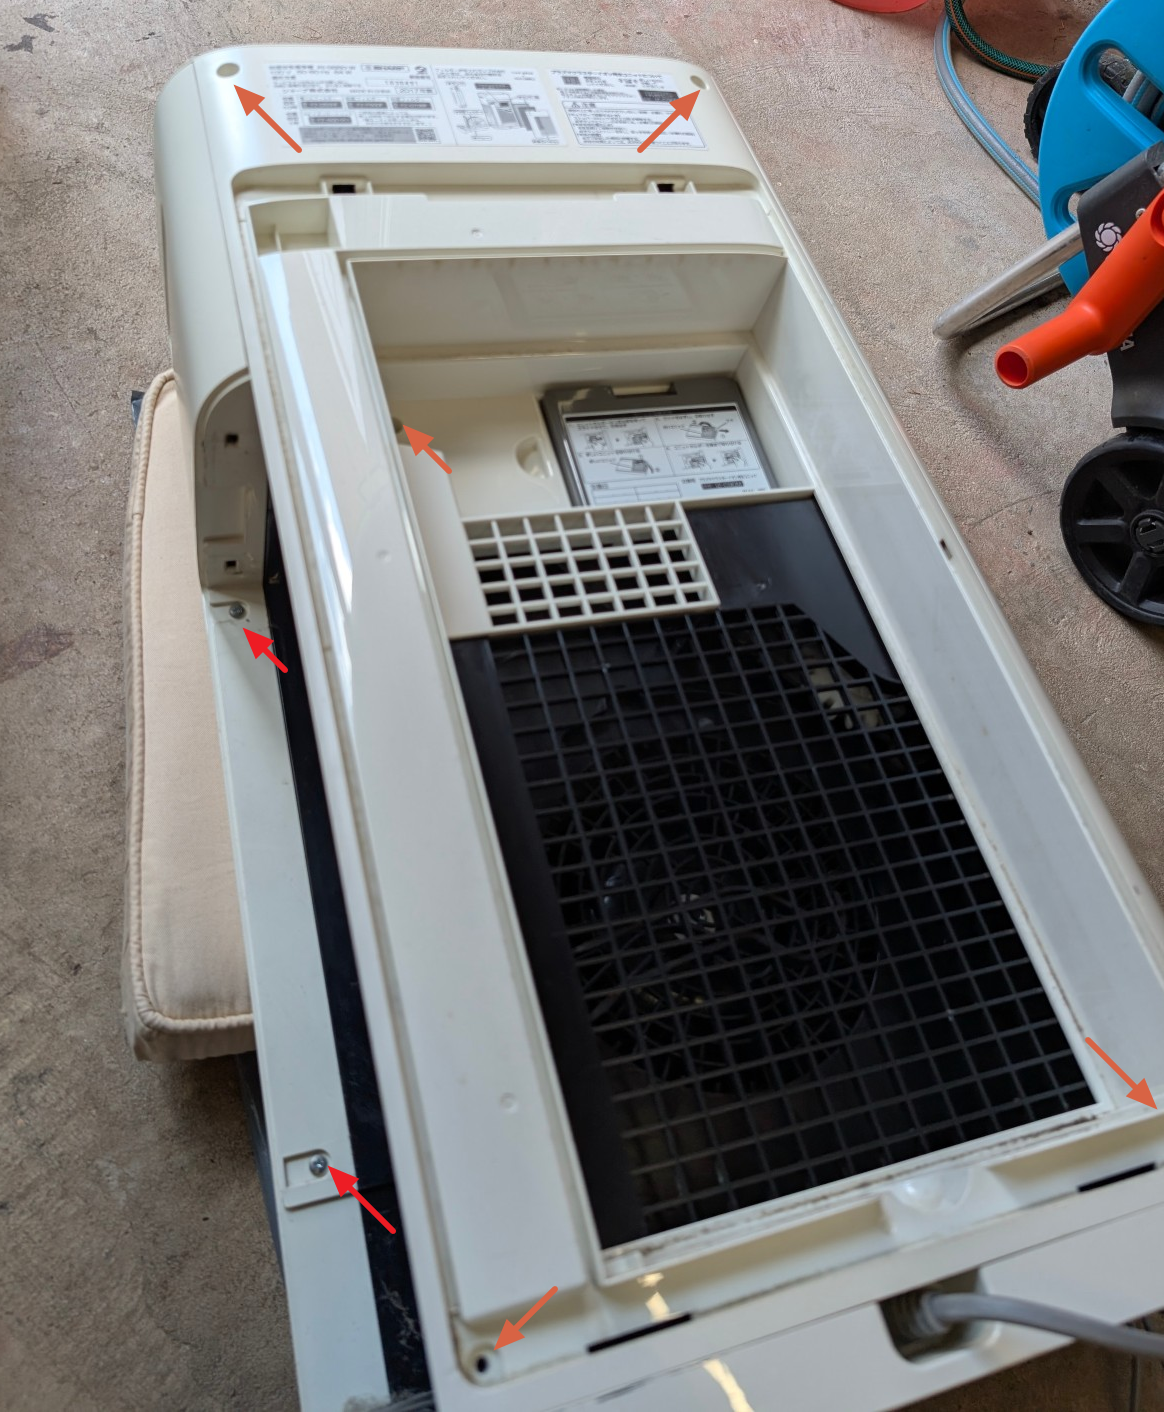
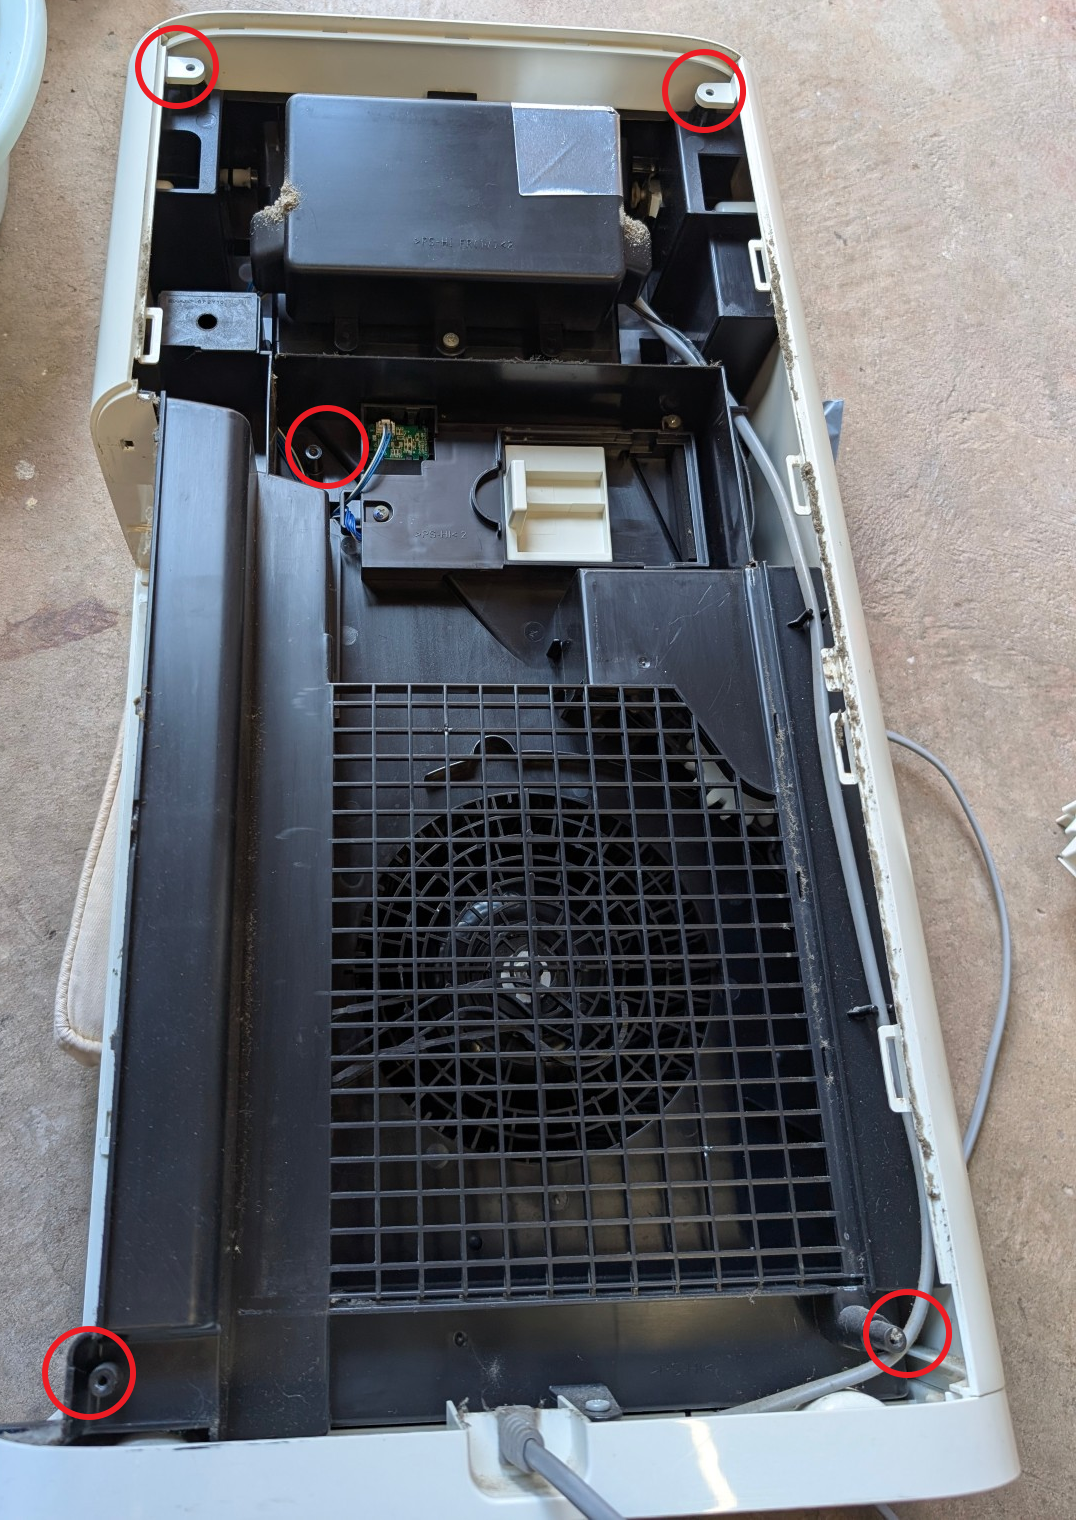
- Lay down the machine on a cushioned surface (to prevent scratches), remove the screws of the back enclosure
クッション性のある場所にマシンを置き(傷を防ぐため)、背面筐体のネジを外す。
Some screws showing in the picture are for the front enclosure. (Red)
写真に写っているいくつかのネジは前面筐体用です。(赤)
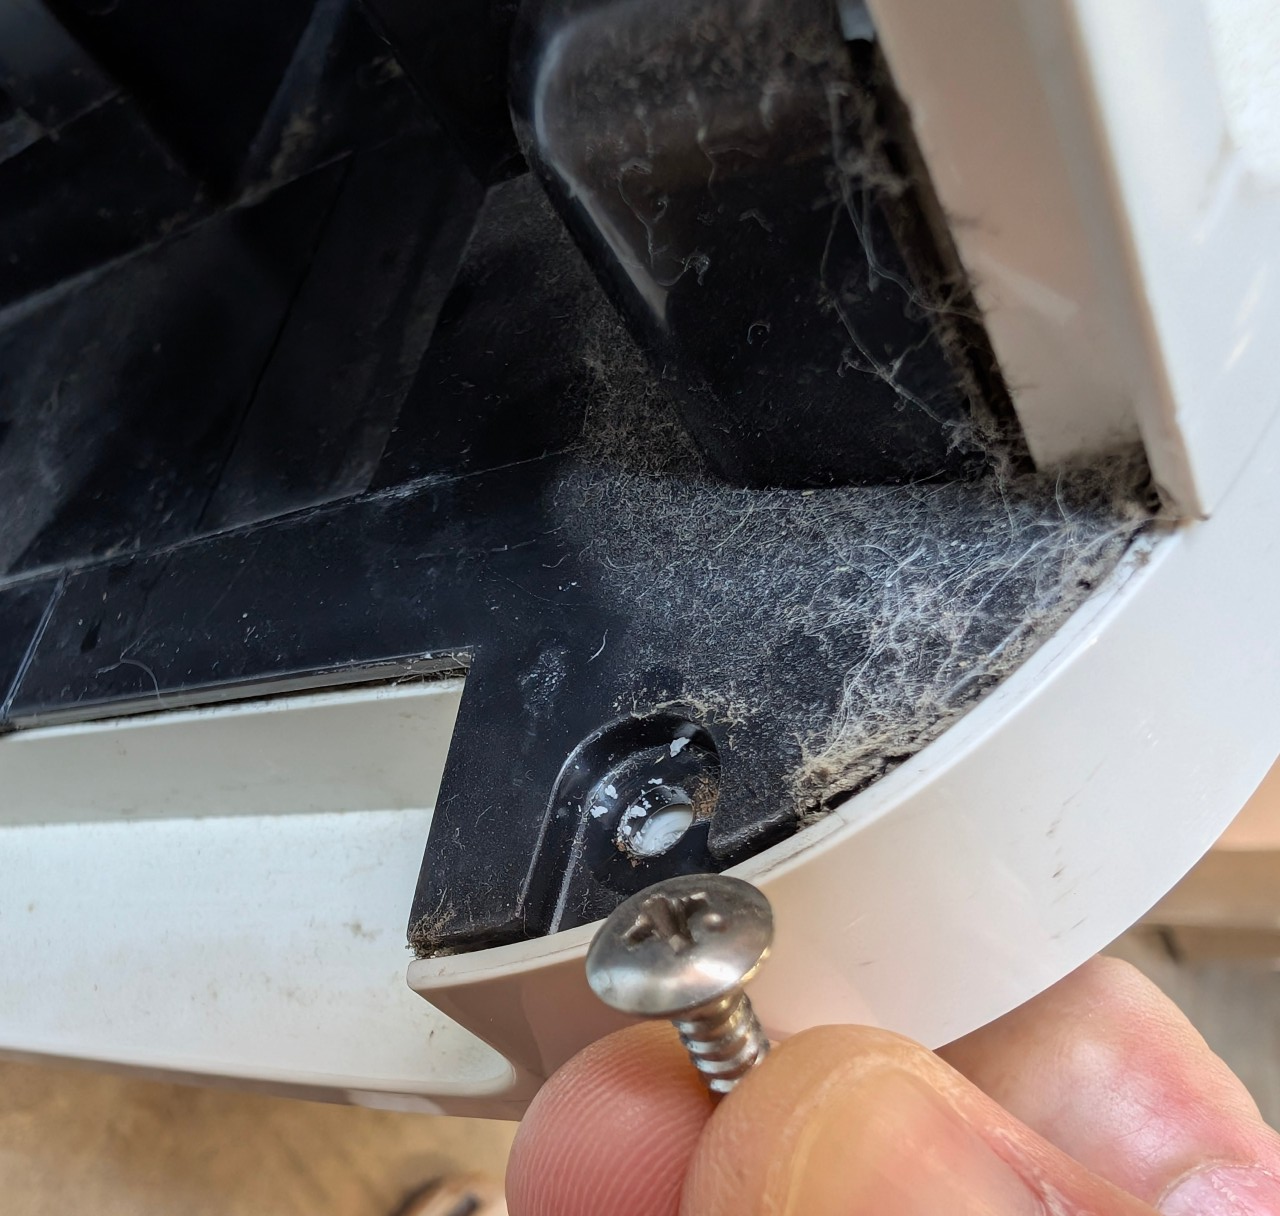
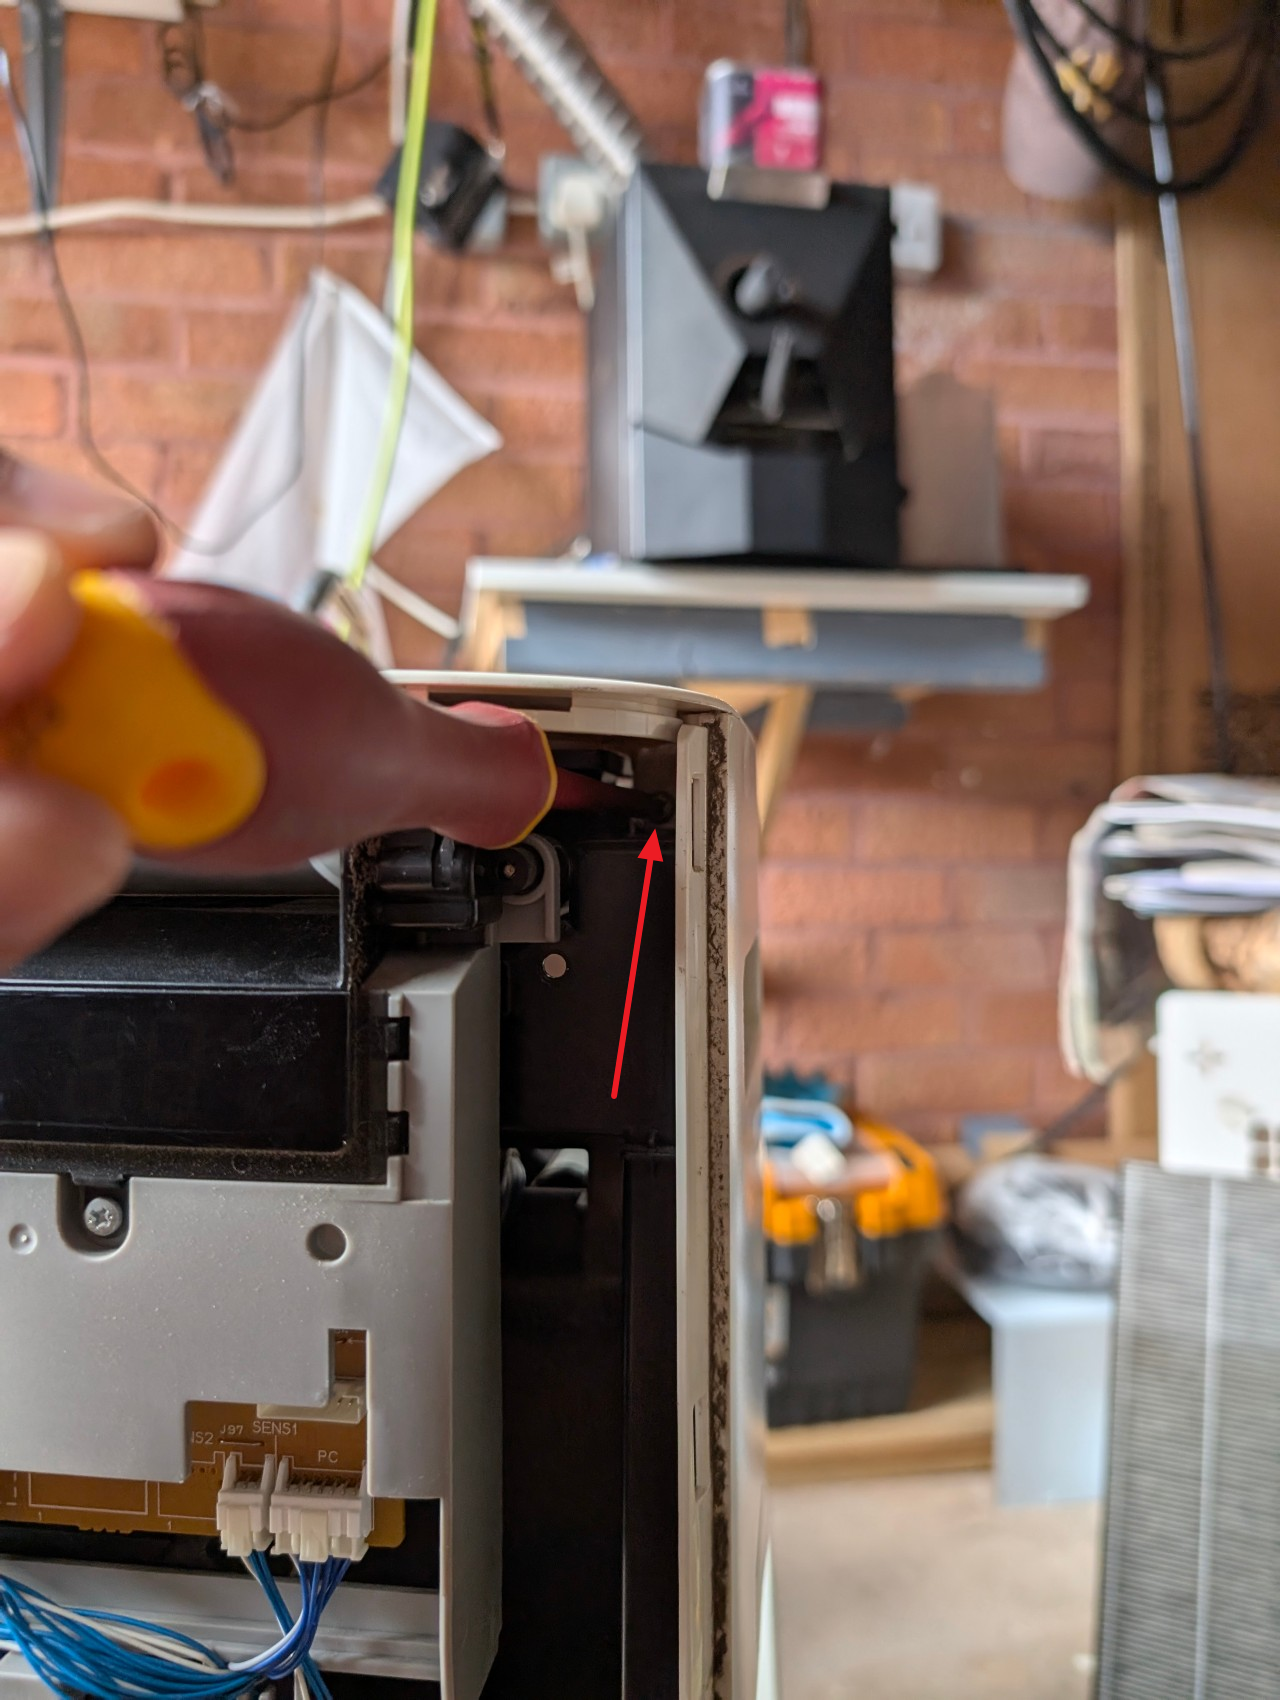
- Remove the screw near the water tank. (Be aware that this screw is different from the other screws, keep it separately)
水タンク付近のネジを外す。(このネジは他のネジと違うので、別に保管してください)


- Remove the back enclosure carefully
背面のエンクロージャーを慎重に取り外す
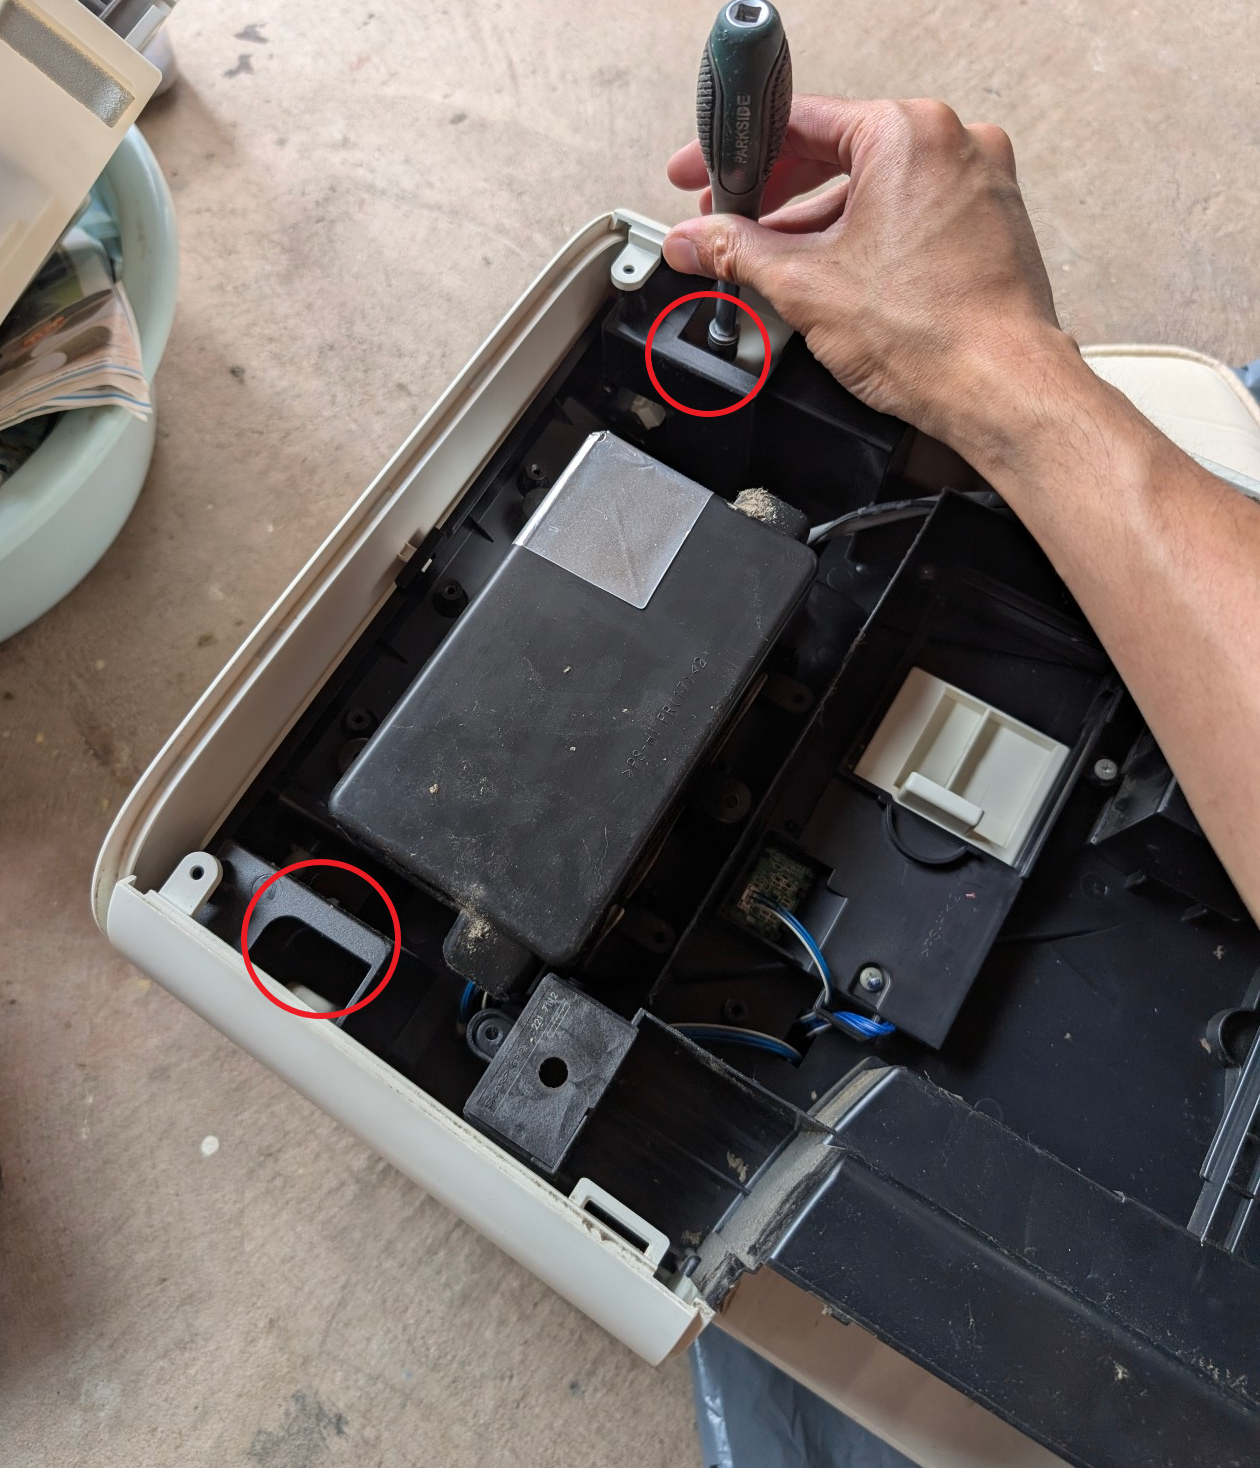
- Remove two screws for the front panel
(You may need a longer screwdriver to reach it)
フロントパネルのネジ2本を外す
(届くように長いドライバーが必要かもしれません。)
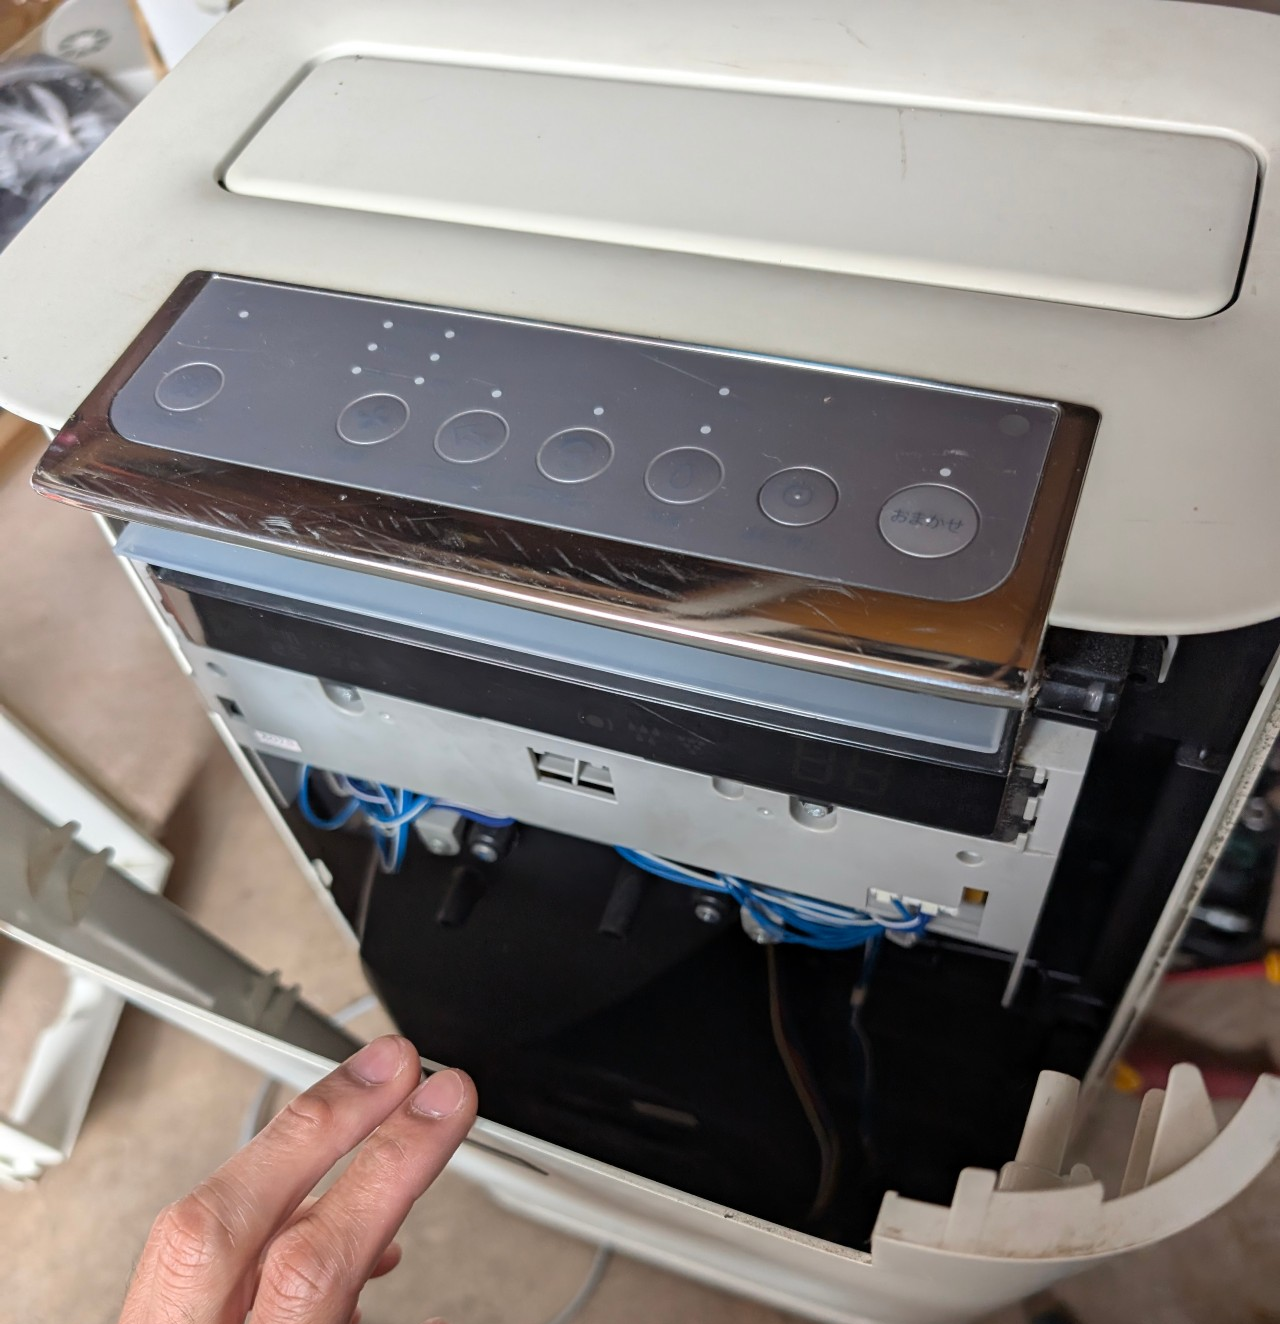
- Remove the front panel carefully
フロントパネルを慎重に取り外す

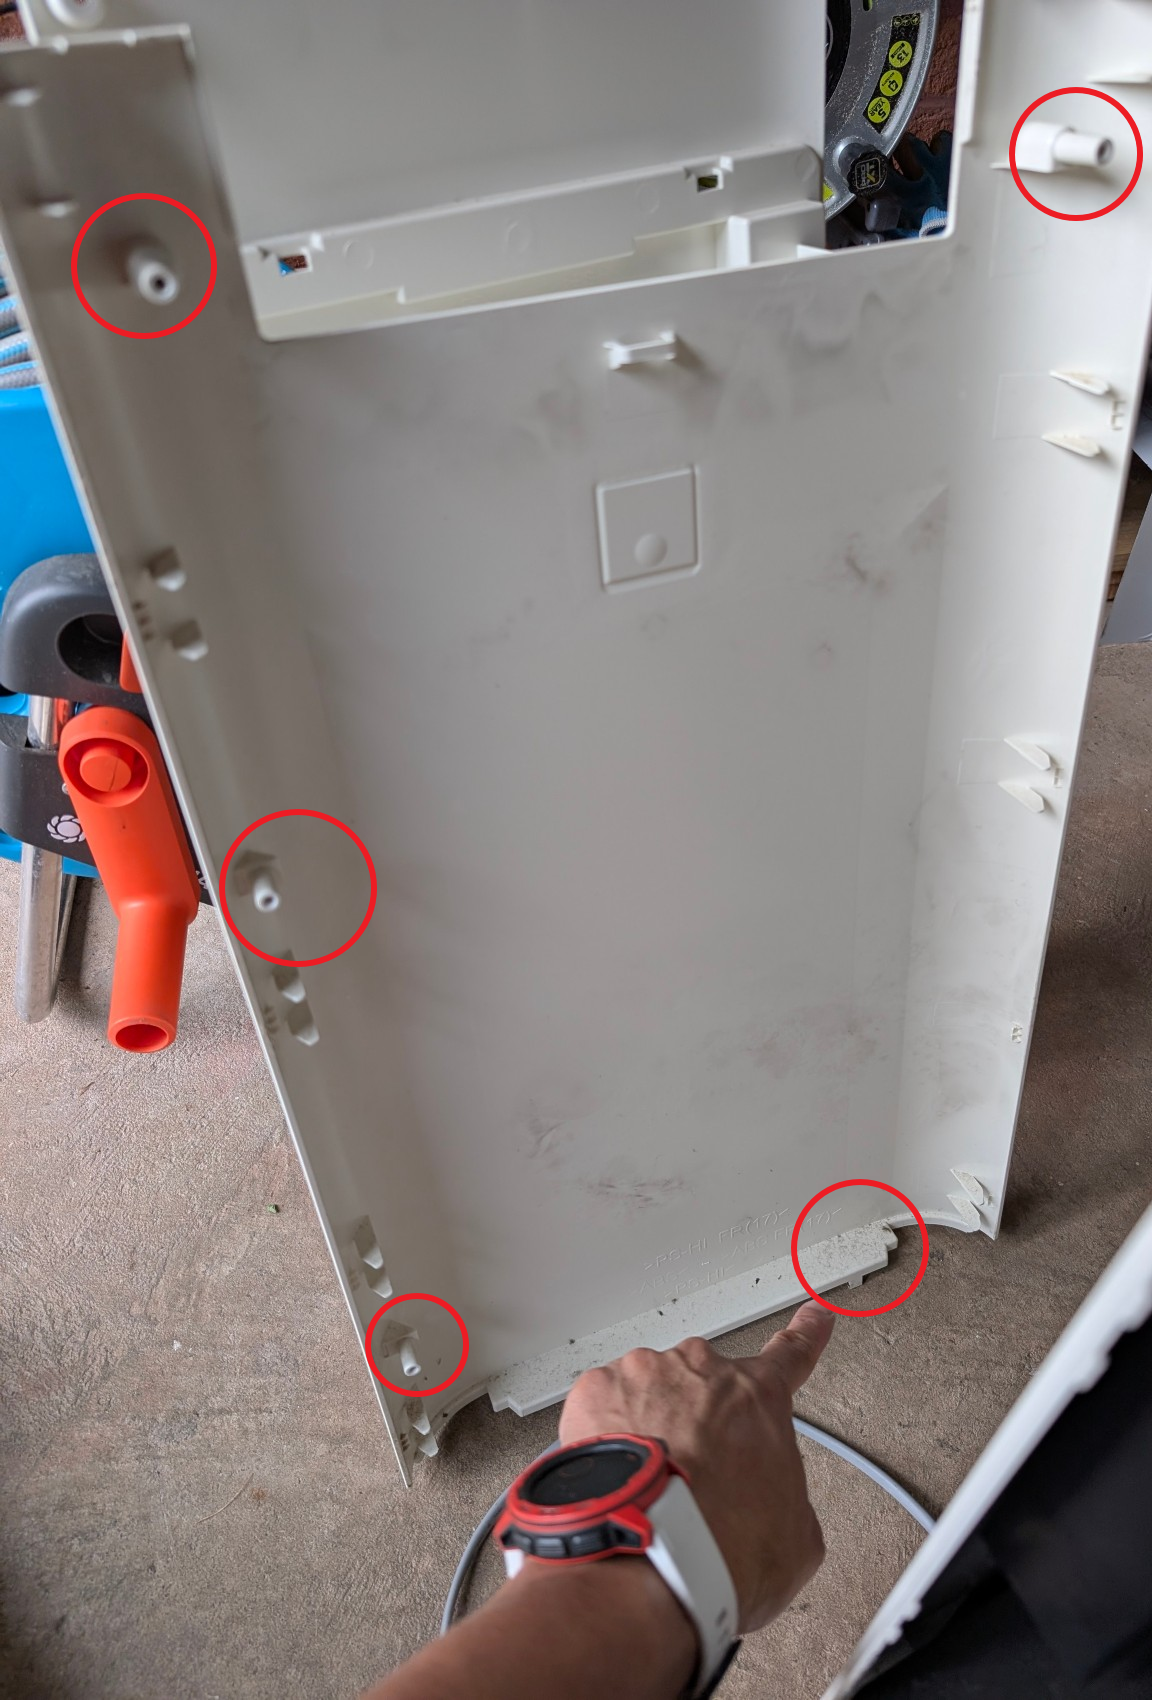
- At the bottom of the machine, there is a tab to hold the front cover, you may need to pry down the tab to remove the cover.
マシンの下部にはフロントカバーを固定するタブがあり、カバーを取り外すにはタブをこじ開ける必要があるかもしれません。

- From front side, remove two screws securing the top enclosure
前面から、上部の筐体を固定しているネジ2本を外します。

- Remove the top and side enclosures
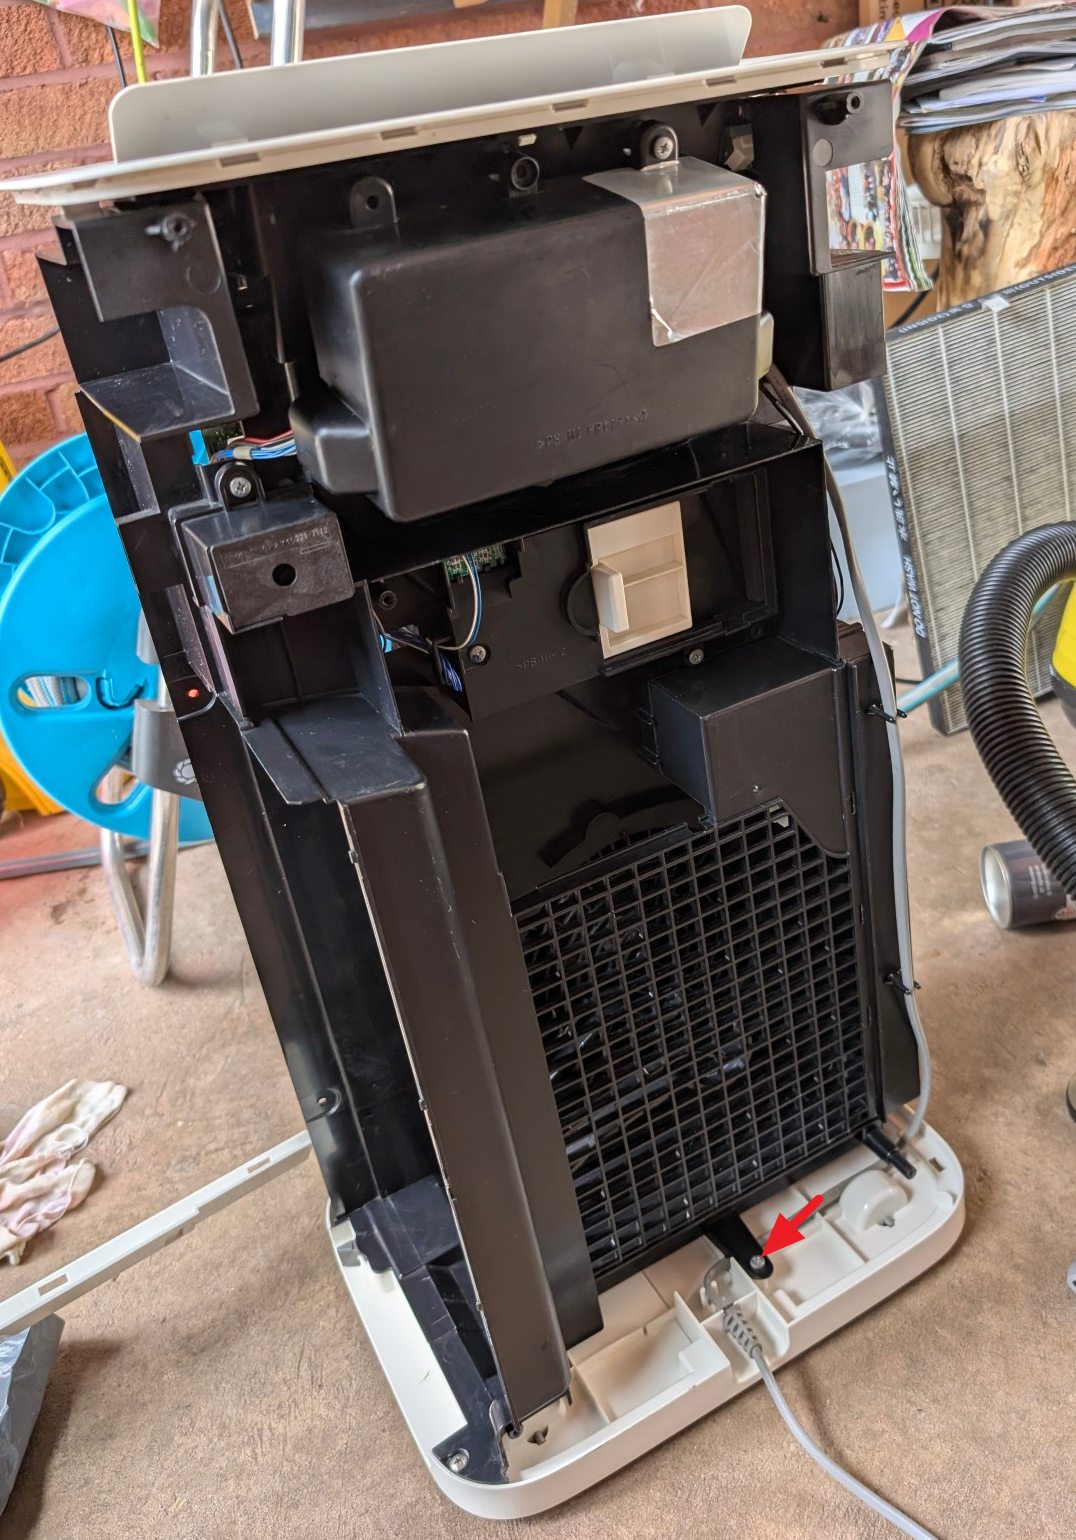
トップとサイドのエンクロージャーを取り外す - Lay down the machine again (Front towards you), remove screws securing the fan duct.
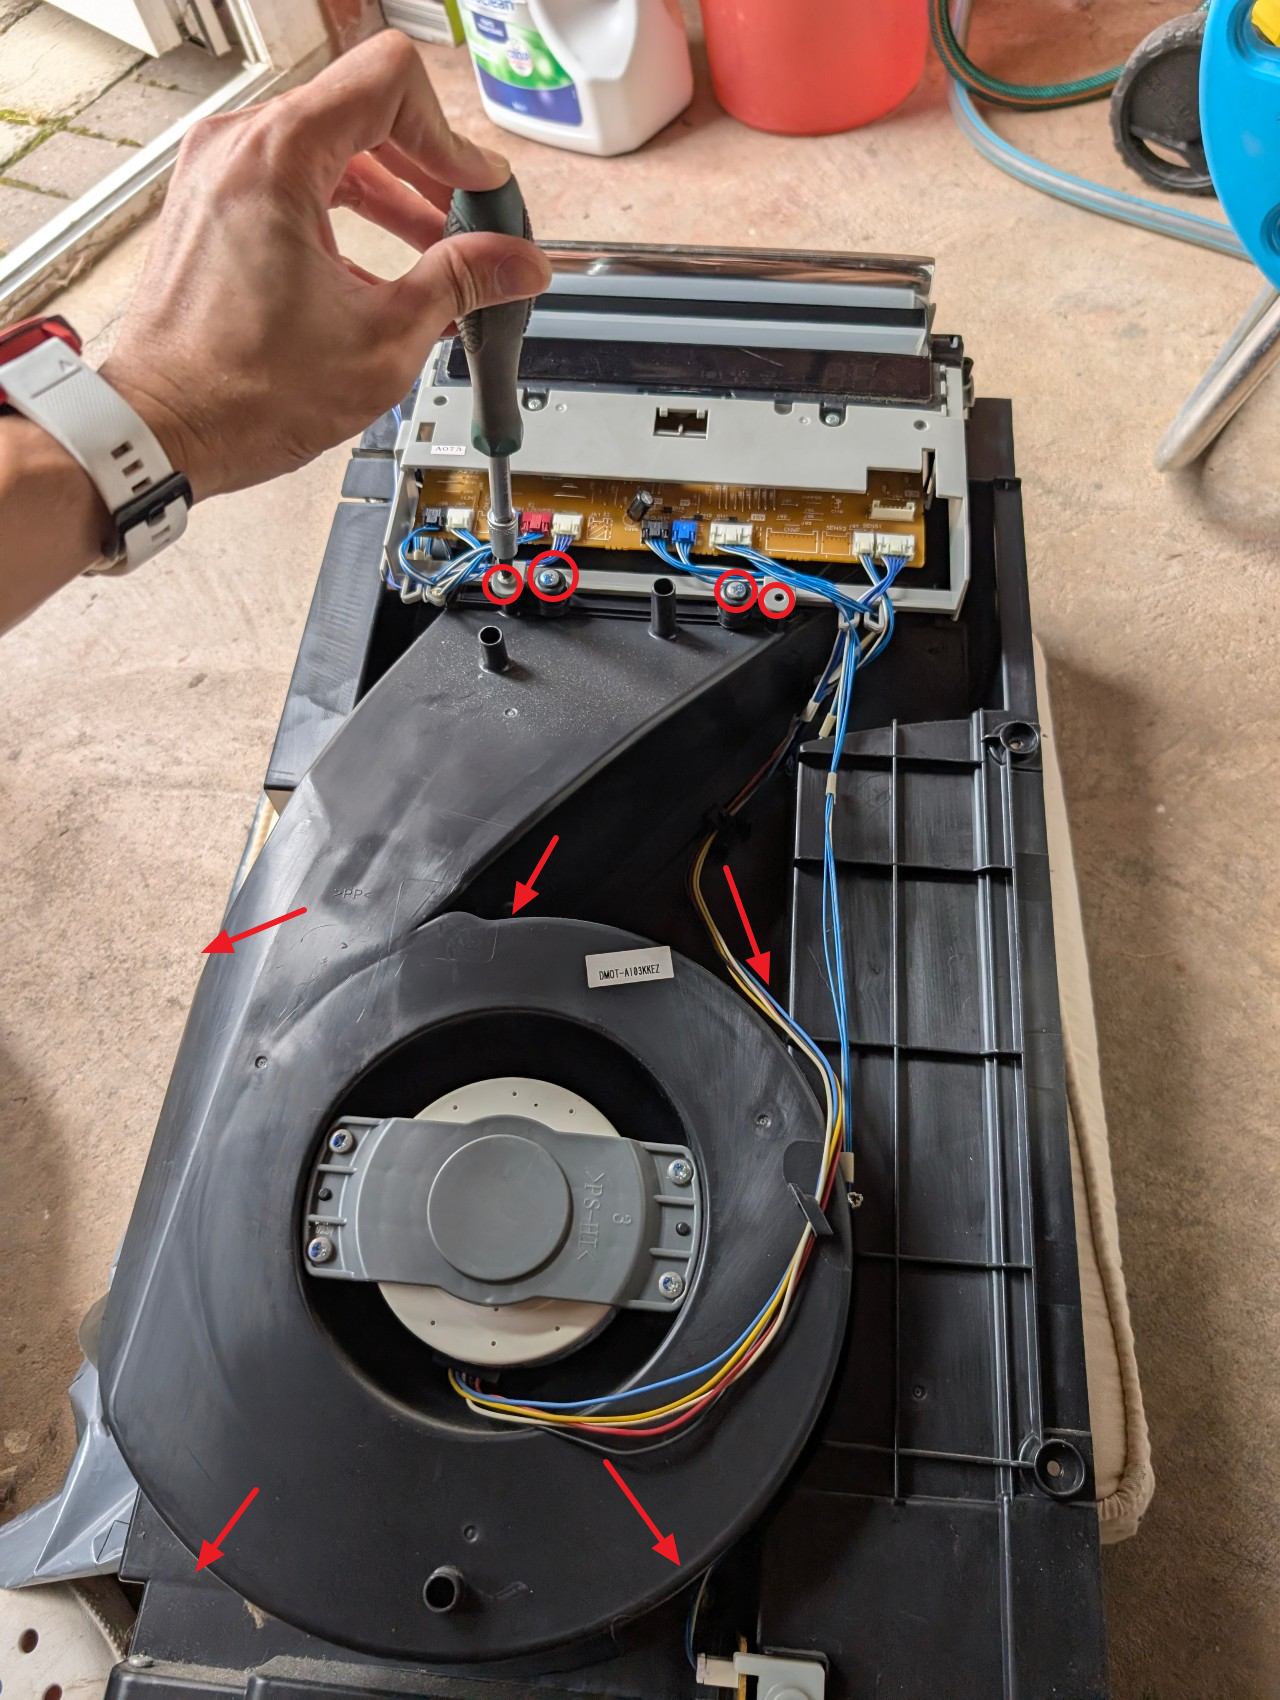
マシンを再び横にし(前面が手前)、ファンダクトを固定しているネジを外します。
7 screws on fan duct, 2 screws at the connecting part.
ファンダクトのネジ7本、接続部のネジ2本。

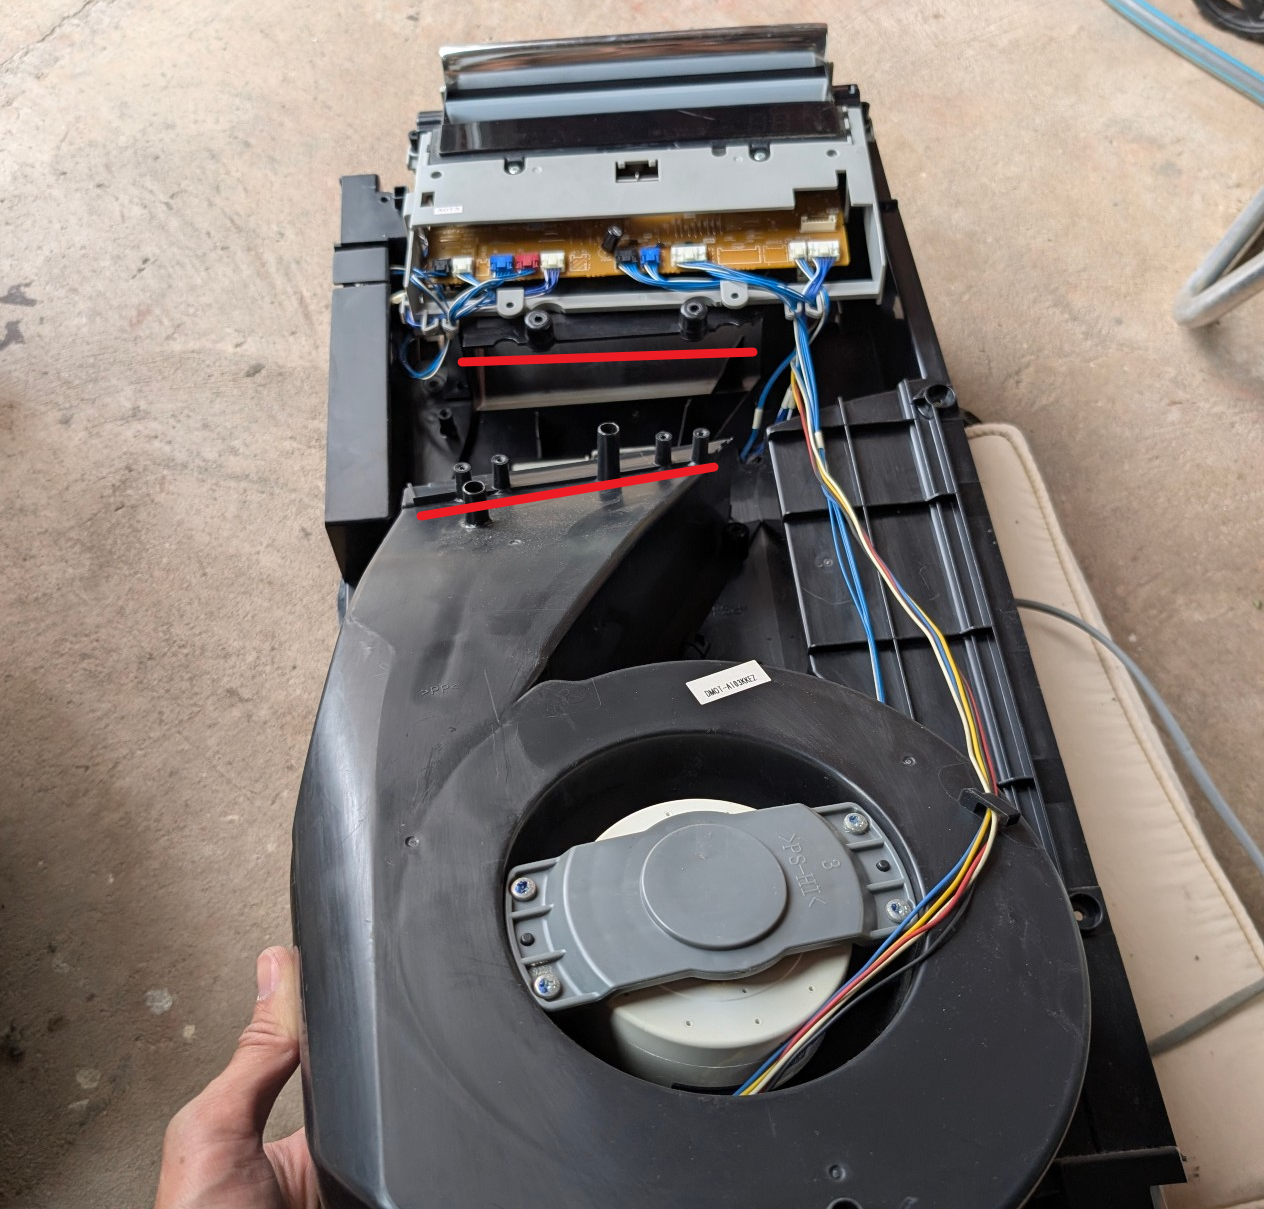
- The fan duct is clipped on the machine, lift the bottom part and remove it from the machine carefully
ファンダクトはマシンに取り付けられているので、下の部分を持ち上げてマシンから慎重に取り外します。

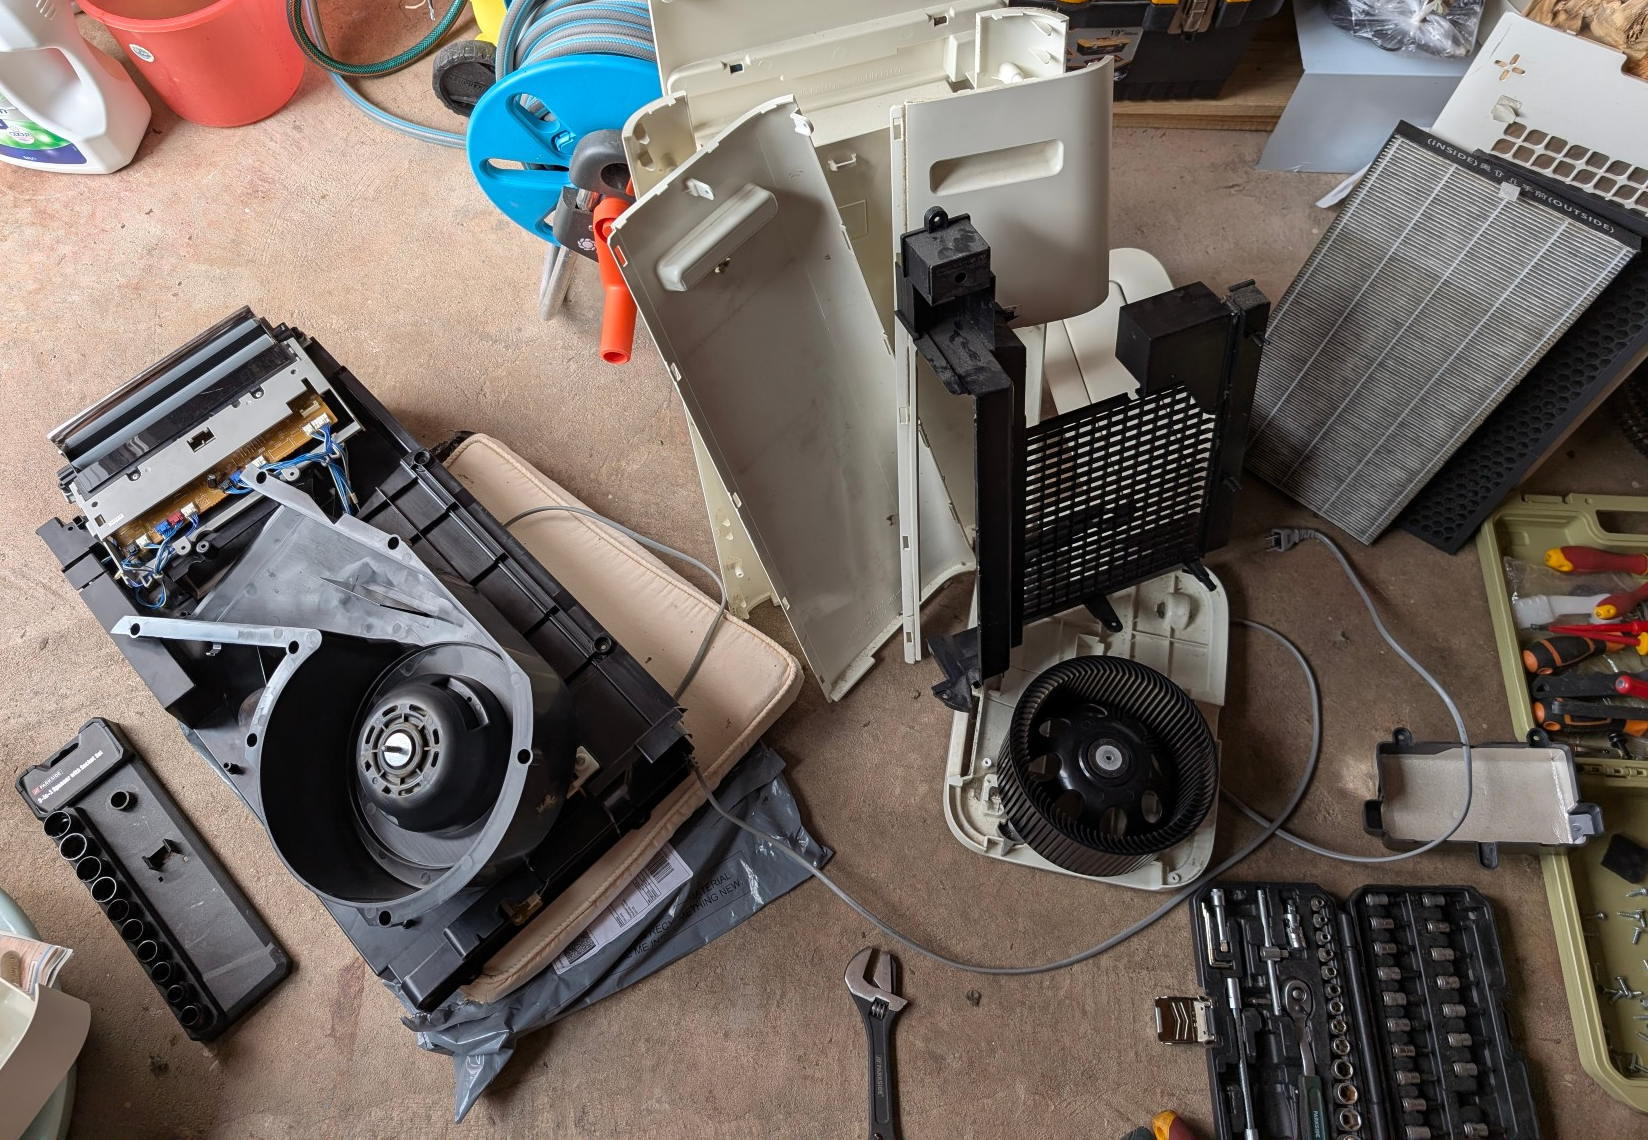
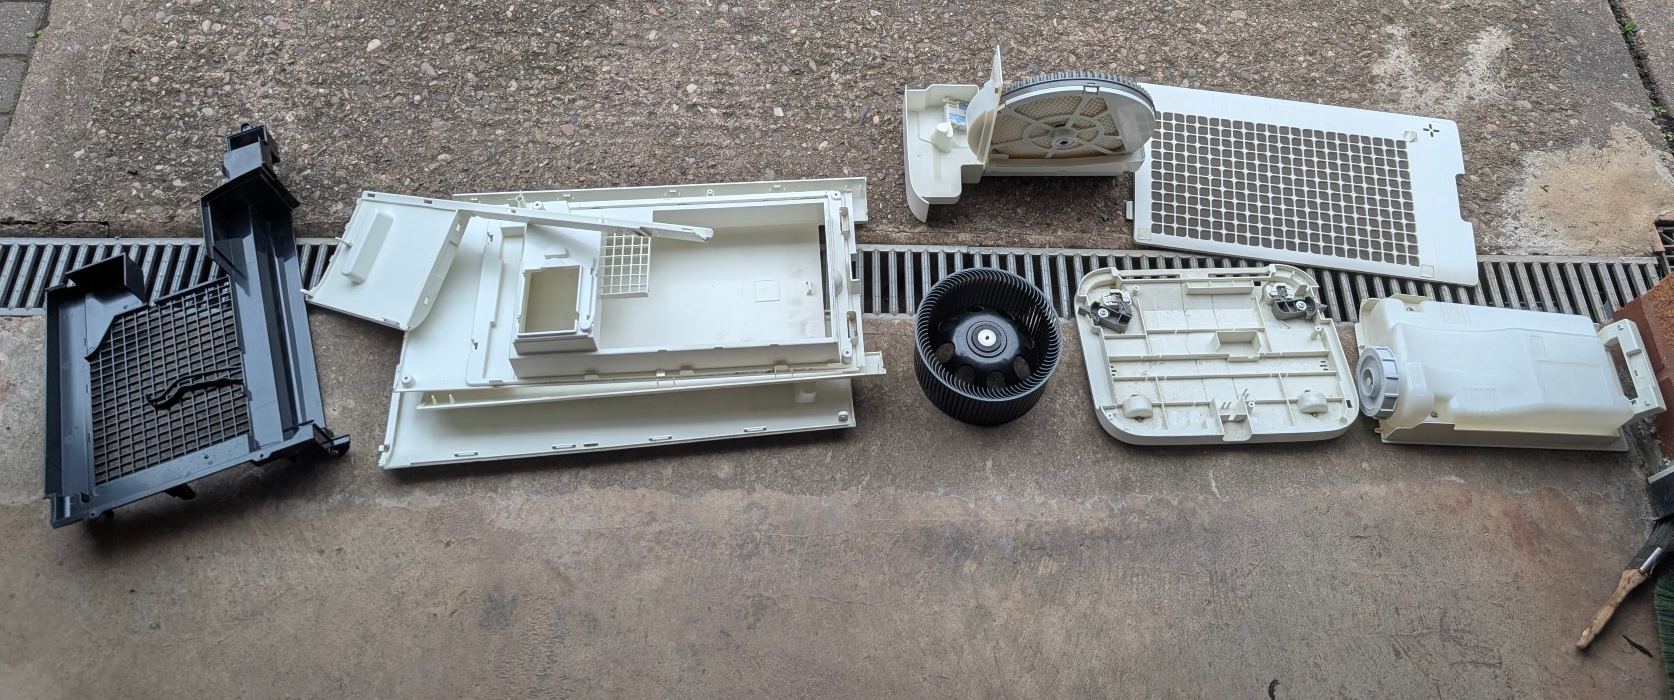
- At this point, you should be able to separate most of the parts.
この時点で、ほとんどのパーツを切り離すことができるはずだ。


清酒の醸造 (Sake) - EC1118
Part 1: Rice Koji Production (米麴)
Specifications & Ratios
- Raw White Rice (Short-grain/Sushi Rice): 2 Go (approx. 300g)
- Koji-kin Starter (Aspergillus oryzae): 0.6g (0.2% of raw rice weight)
- Plain Flour: 6g (Used as a dispersing agent to mix with the starter spore powder)
- Target Incubation Temp: 30°C - 35°C
- Absolute Maximum Temp: 42°C (Spores die above this limit)
- Total Fermentation Duration: 48 Hours
Step-by-Step Instructions
1. Washing & Soaking (Washing to Translucency)
- Wash the 300g of raw rice repeatedly until the water runs completely crystal clear. This removes surface starches that cause stickiness.
- Soak the rice in room-temperature water. Soak for 6–8 hours during summer, or up to 12 hours during winter.
2. Draining & Steaming (The "Firm Outside, Soft Inside" Rule)
- Pour the soaked rice into a mesh colander and drain for at least 1 to 2 hours. The surface of the rice grains must feel completely dry to the touch before steaming.
- Line a steamer with a clean, damp cotton cloth. Pour the drained rice inside and poke a few vent holes through the rice layer using your finger to let steam pass.
- Steam over high heat for 30–40 minutes once the water reaches a rolling boil.
- Quality Check: Taste a few grains. They must be firm on the outside but soft inside, without any hard, dry uncooked white core. It must not be sticky or mushy like regular table rice.
3. Cooling & Inoculation (Seeding the Spores)
- Spread the steamed rice across a clean, dry flat tray. Use a rice paddle to fluff and break up any clumps. Let it cool down naturally to 36°C - 38°C (lukewarm to the touch).
- In a small dry bowl, thoroughly blend the 0.6g of Koji starter powder with the 6g of Plain Flour.
- Fit a fine-mesh tea strainer over the tray and dust the powder mixture over the rice in 2 or 3 separate batches. Mix thoroughly between each dusting to guarantee every grain is evenly coated.
4. Primary Incubation (Hours 0–24)
- Bundle the inoculated rice tightly into a clean, completely dry cotton cloth.
- Place the bundle inside an environment capable of holding a stable temperature of 30°C–32°C with 80%–90% humidity (e.g., an oven with only the light turned on, or a rice cooker set to a monitored Yogurt Mode). Place a mug of hot water next to the bundle to provide moisture, and prop the door/lid open slightly to vent condensation.
- Around hour 18 to 24, you will notice the rice grains losing their shine and developing a matte appearance. Faint white, thread-like mycelium will begin to sprout.
5. Turning & Temperature Regulation (Hours 24–48)
- First Turning (approx. Hour 24): The koji will begin generating its own biological heat. Unwrap the bundle, break up any matted rice clumps, mix thoroughly to distribute heat and oxygen, and bundle it back up a bit more loosely this time.
- Second Turning (approx. Hour 32–36): The mycelial growth will accelerate rapidly, causing the internal temperature of the rice clump to spike. Check the temperature using a probe thermometer every 2–3 hours. If the core temperature hits 39°C–40°C, unpack the rice immediately, spread it thin on the tray to dissipate heat, and shut off your artificial heat source. Never let the core temperature breach 42°C.
- Harvest (Hour 48): The white mycelium should bind the rice together into a firm, solid white cake that detaches neatly from the tray. It should emit a sweet, fragrant aroma reminiscent of fresh mushrooms or sweet rice wine. Break the cake apart gently into loose grains to cool it down and halt growth.
Part 2: Sake Brewing (清酒)
Specifications & Ratios (Single-Stage "All-In" Formula)
- Homemade Rice Koji: Half of your batch (approx. 150g)
- Steamed Rice (Main Adjunct): 1 Go raw weight (approx. 150g), washed, soaked, steamed, and cooled to 20°C.
- Water (Filtered/Bottled Mineral Water): 450ml (3 times the weight of the raw ingredient)
- Lalvin EC-1118 Active Dry Yeast: 0.5g (Approx. 1/10th of a teaspoon)
- Fresh Lemon Juice: 1 Teaspoon (Crucial for lowering pH to block spoilage)
- Fermentation Temp: 12°C - 16°C (Cool ambient room, unheated hallway)
- Duration: 14 - 21 Days
Step-by-Step Instructions
1. Vessel Preparation & Yeast Hydration
- Sanitize a 1.5L to 2L glass jar or food-grade fermentation vessel, along with all mixing spoons, using boiling water. Ensure everything is free of grease and soap residues.
- Rehydrate 0.5g of EC-1118 yeast in 30ml of lukewarm water (approx. 30°C) for 15 minutes until small bubbles form on the surface.
2. Mixing & Sealing
- Pour 450ml of bottled water and 1 teaspoon of fresh lemon juice into your sanitized jar.
- Add the 150g of prepared homemade rice koji and the 150g of steamed white rice (which must be cooled to 20°C–25°C).
- Pour in the rehydrated yeast liquid and stir the mixture vigorously from bottom to top using a sanitized spoon.
- Seal the vessel tightly with a lid fitted with a fermentation airlock (or secure a layer of plastic wrap around the mouth using a rubber band and prick a few tiny pinholes for gas escape). The mixture should fill roughly 40%–50% of the jar's volume to allow space for expansion.
3. The Active Fermentation Window (Days 1–3)
- Store the vessel in a cool, dark place out of direct sunlight, ideally keeping the room temperature between 12°C and 16°C.
- During the first 24 to 48 hours, the rice will absorb almost all the liquid, turning the mixture into a thick, porridge-like paste.
- Daily Maintenance: Open the lid once every 24 hours for the first 3 days only. Use a sanitized spoon to give the brew a thorough 1-minute stir to distribute the yeast and introduce oxygen. Reseal immediately. You will hear fizzy, effervescent popping sounds.
4. Low-Temperature Managed Fermentation (Days 4–21)
- Leave the vessel completely sealed. Do not stir or open the lid after Day 3.
- The active fermentation will peak between Days 4 and 10. Carbon dioxide will drive the rice grains upward into a thick floating cap, with a milky liquid layer bubbling beneath it.
- By Day 11–14, the bubbling will slow down. Because the starch is being converted to sugar and consumed by the yeast, the rice grains will lose structural weight and begin sinking to the bottom.
5. Pressing & Harvesting (The Final Polish)
- Between Day 14 and 21, the bubbling will stop entirely, and the airlock will fall silent. The top half of the liquid will turn semi-transparent and clear up, while a thick layer of white sediment rests at the bottom.
- Sterilize a fine mesh straining bag or cheesecloth with boiling water. Pour the contents of the jar into the bag and press firmly with clean hands to squeeze out every drop of liquid.
- The resulting creamy, opaque liquid is traditional cloudy sake (Nigorizake). For clear sake, store this liquid in a sealed bottle inside a 4°C refrigerator for 3 days; the fine starch sediment will settle to the floor of the bottle, allowing you to siphon off the clear, straw-colored sake from the top. Store under refrigeration and enjoy within a month.
第一部:米麹の製造 (米麹)
配合比・規格
- 原料米(うるち米/寿司米): 2合(約 300g)
- 種麹(ニホンコウジカビ): 0.6g(原料米重量の 0.2%)
- 薄力粉(小麦粉): 6g(微量の種麹粉末を均一に散布するための増量剤として使用)
- 目標製麹温度: 30°C - 35°C
- 絶対限界温度: 42°C(これを超えると麹菌が死滅します)
- 総製麹時間: 48時間
詳細な手順
1. 洗米と浸漬(透明になるまで洗う)
- 300gの原料米を、洗米水が完全に透明になるまで何度も丁寧に洗います。米の表面の澱粉質(ぬか・粘り気のもと)を完全に洗い流すためです。
- 常温の水に米を浸します。夏場は 6〜8時間、冬場は最長 12時間 浸漬させます。
2. 水切りと蒸し(外硬内軟の原則)
- 浸漬した米をザルに上げ、少なくとも1〜2時間 しっかりと水切りをします。蒸す前に、米の表面が完全に乾いた手触りになるまで水分を飛ばします。
- 蒸し器に清潔な固く絞った綿布を敷き、水切りした米を入れます。蒸気が通りやすくなるよう、指で米の層にいくつかの通気穴を開けます。
- 水が沸騰してから、強火で 30〜40分間 一気に蒸し上げます。
- 蒸し上がりの確認: 数粒を食べて確認します。「外側は弾力があり、内側は柔らかく、芯(生の白い部分)が全く残っていない」状態(外硬内軟)が完璧です。通常の米のように粘り気が出たり、柔らかすぎたりしてはいけません。
3. 放冷と種付け(播種)
- 蒸し上がった米を清潔で乾燥した大きなトレイに広げ、しゃもじでダマをほぐしながら、自然に 36°C - 38°C(触るとほんのり温かい、人肌程度)まで冷まします。
- 清潔な乾燥した小さな器の中で、0.6gの種麹粉末と6gの薄力粉をしっかりと混ぜ合わせます。
- トレイの上に目の細かい茶漉しなどをかざし、混ぜ合わせた麹粉を2〜3回に分けて均一に米の表面に振りかけます。振るうたびに米を底からしっかりと混ぜ合わせ、すべての米粒に麹粉が行き渡るようにします。
4. 引き込みと初期保温(0〜24時間)
- 種付けした米を、清潔で完全に乾燥した綿布でしっかりと包み込みます。
- 温度を 30°C〜32°C、湿度を 80%〜90% に維持できる環境(例:オーブンの庫内灯のみを点灯させる、または炊飯器のヨーグルトモードで蓋を完全に閉めずに少し隙間を開ける)にトレイごと入れます。湿度を保つため、包みの横に熱湯を入れたマグカップを置き、結露を防ぐために少し換気を行います。
- 18〜24時間ほど経つと、米の表面のツヤが消えてマットな質感になり、肉眼で非常に細かい産毛のような白い菌糸がポツポツと見え始めます。
5. 盛り・仲仕事・仕舞仕事(24〜48時間)
- 切り返し・盛り(約24時間後): 麹自身が発熱(品温上昇)し始めます。布を開け、塊になった米粒を優しく手でほぐし、全体を混ぜ合わせて酸素を供給します。今度は少し緩めに包み直して戻します。
- 品温管理(約32〜36時間後): 菌糸の増殖がピークを迎え、麹の温度が急上昇します。2〜3時間おきに棒状温度計を米の真ん中に刺して計測してください。もし品温が 39°C〜40°C に達したら、すぐに布を開けて米をトレイに薄く広げ、熱を逃がし、人工的な加熱源を切ってください。 品温が 42°C を超えないように絶対注意します。
- 出麹(48時間後): 白い菌糸が米粒をしっかりと包み込み、全体が綺麗に「破風(板状の塊)」になります。新鮮なキノコや甘酒のような、非常に心地よい甘い香りが漂います。塊を優しくほぐして品温を下げ、発酵を止めれば米麹の完成です。
第二部:清酒の醸造 (Sake)
仕込み配合比(ワンステップ簡略版)
- 自家製米麹: 半量(約 150g)
- 掛け米(蒸し米): 1合分の原料米(約 150g)。洗米・浸漬後、蒸し上げて 20°C まで完全に冷ましたもの。
- 仕込み水(ミネラルウォーター推奨): 450ml(原料米重量の約3倍)
- Lalvin EC-1118 ドライイースト: 0.5g(小さじ 1/10 程度、ごくわずか)
- 新鮮なレモン汁: 1ティースプーン(pHを下げて雑菌の繁殖を防ぐために極めて重要)
- 発酵環境温度: 12°C - 16°C(家の中で最も涼しく、暖房の入らない場所。廊下や床下など)
- 総発酵期間: 14 - 21日間
詳細な 手順
1. 器具の消毒とイーストの予備発酵
- 容量1.5L〜2Lのガラス瓶または食品用発酵容器、および攪拌用のスプーンを沸騰させた熱湯で完全に消毒します。油分や洗剤の残留物が一切ない状態にしてください。
- 小さな清潔なコップに30mlのぬるま湯(約30°C)を用意し、0.5gのイーストを振り入れ、15分間静置します。表面に細かい泡が湧き上がってきたら予備発酵完了です。
2. 仕込み(オールイン)
- 消毒した発酵容器に、仕込み水450mlと新鮮なレモン汁1ティースプーンを入れます。
- 150gの自家製米麹と、20°C〜25°Cまで完全に冷ました掛け米1合分を加えます(米が温かいとイーストが死滅します)。
- 予備発酵させたイースト液を流し込み、消毒したスプーンで底からしっかりと全体をかき混ぜます。
- 容器の蓋をしっかり閉め、エアーロックを取り付けます(または、ラップを被せて輪ゴムで固定し、針でガス抜きの小さな穴を3〜4箇所開けます)。発酵による膨張を考慮し、仕込み液の量が容器の4〜5割程度に収まるようにします。
3. 活発な発酵と毎日の攪拌(1〜3日目)
- 発酵容器を、直射日光の当たらない涼しい場所(12°C〜16°C)に設置します。
- 最初の24〜48時間は、米がすべての水分を吸い上げてしまい、水気のないドロドロとしたお粥のようになりますが、これは正常な状態です。
- 毎日の作業: 最初の3日間のみ、24時間に1回蓋を開け、消毒したスプーンで底から1分間しっかりと攪拌してイーストに酸素を供給し、米の溶解を促します。攪拌後はすぐに密閉します。炭酸ガスによる「シュワシュワ、ポツポツ」という小気味よい音が聞こえます。
4. 低温静置発酵(4〜21日目)
- 4日目以降は、絶対に攪拌せず、蓋も開けないでください。
- 4日目から10日目にかけて発酵がピークに達します。ガスによって米粒が表面に押し上げられ、厚い「米の層(醪の浮上)」が形成され、その下で乳白色の液体が激しく泡立ちます。
- 11〜14日目頃になると、発酵が落ち着いてきます。米の内部の澱粉が分解されてイーストに消費されたため、米粒が軽くなり、徐々にすべての米糟が底に沈殿し始めます。
5. 上槽(搾り・収穫)
- 仕込みから14〜21日の間で、容器内の泡立ちが完全に止まり、米粒がすべて底に沈み、上部の液体が乳白色から半透明の澄んだ状態に変わったら発酵完了です。
- 熱湯消毒した細かなメッシュの濾過袋(または大きめの万能こし布)を用意し、容器の中身をすべて流し込み、清潔な手で力強く絞って液体を抽出します。
- 搾り出された乳白色の液体が、そのまま飲める「濁り酒(Nigorizake)」です。澄んだ清酒にしたい場合は、この液体を密閉瓶に入れて4°Cの冷蔵庫で3日間静置します。細かい米糟が完全に底に沈殿した後、上部の澄んだうっすらと黄色みがかったお酒だけを別の瓶に静かに移し替えます。必ず冷蔵庫で保管し、1ヶ月以内にお召し上がりください。
第一部分:製作米麴 (Koji)
配方比例與規格
- 生白米(壽司米/短粒米): 2合(約 300g)
- 改良長白菌粉(麴菌): 0.6g(生米重量嘅 0.2%)
- Plain Flour(普通麵粉): 6g(用嚟做增稠/稀釋劑,方便均勻撒開微量嘅菌粉)
- 發酵目標溫度: 30°C - 35°C
- 絕對最高溫限制: 42°C(超過呢個溫度菌種會直接熱死)
- 總發酵時間: 48 小時
詳細製作步驟
1. 洗米與浸米(洗至清澈)
- 將 300g 生米徹底清洗,反覆揉洗直到洗米水完全變到清澈見底為止,洗走表面所有會令米飯黏糊嘅澱粉質。
- 用室溫水浸米。夏天浸 6–8 小時,冬天則需要浸足 12 小時。
2. 瀝乾與蒸米(外硬內軟法則)
- 將浸好嘅米倒入篩箕,徹底瀝乾水分 至少 1 至 2 小時。蒸米前,米粒表面必須完全摸不到水氣、呈乾爽狀態。
- 蒸鍋鋪上一條乾淨嘅濕棉布,倒入瀝乾嘅米。用手指喺米堆中戳幾個通氣孔,幫助蒸汽上升。
- 水滾之後,用大火蒸 30–40 分鐘。
- 熟度檢查: 攞幾粒米放落口咬。必須達到「外軟內硬、粒粒分明、完全無生米心」嘅彈性狀態,絕對唔可以好似平時食飯咁煮到軟爛黏手。
3. 降溫與接菌(落種)
- 將蒸好嘅熟米倒喺乾淨、乾燥嘅大托盤上,用飯勺撥開、翻拌,等佢自然降溫到 36°C - 38°C(即係摸落去微溫、同體溫差不多、唔燙手)。
- 喺一個乾淨嘅乾燥小碗入面,將 0.6g 長白菌粉同 6g Plain Flour 徹底拌勻。
- 用一個細篩網(如茶濾),將混合菌粉分 2-3 次均勻咁篩喺米飯表面,每撒一次都要由底至上徹底翻拌,確保每粒米都沾到菌粉。
4. 入箱初段發酵(第 0 - 24 小時)
- 將拌好菌嘅米用一條乾淨、完全乾燥嘅棉布緊緊包好,放回托盤。
- 放入保溫設備(例如:焗爐唔開火、只開裡面盞燈;或者電飯煲開 Yogurt Mode 但唔好鎖死蓋,留一條微縫)。環境要維持喺 30°C–32°C,濕度約 80%–90%(可喺旁邊擺一杯熱水提供水氣,並在煲口/爐門墊布防倒汗水)。
- 大約 18-24 小時後,米粒表面會失去光澤,變到霧霧地,肉眼開始睇到極細微、好似汗毛一樣嘅白色菌絲生長。
5. 翻麴與控溫(第 24 - 48 小時)
- 第一次翻麴(約第 24 小時): 米麴開始自己發熱(生物熱能)。打開布包,用手輕輕將結塊嘅米粒全部抓鬆、撥散,重新混合好,然後今次包得稍微鬆少少放返入去。
- 第二次翻麴(約第 32-36 小時): 菌絲進入爆發期,米溫會急速飆升。每隔 2-3 小時必須用溫度計插進米堆中心量度。如果米溫達到 39°C–40°C,必須立刻打開布包,將米平鋪喺托盤上散熱,並關掉人工熱源。 嚴禁令米溫超過 42°C。
- 收成完成(約第 48 小時): 白色嘅菌絲會緊密將米粒抱結成一整塊好似「米餅/板磚」咁樣。聞落去散發出非常舒服、濃郁嘅清甜酒釀味或者生蘑菇香氣。將米餅輕輕揉散降溫,即可完成出麴。
第二部分:清酒釀造 (Sake)
配方比例(一體化簡化版)
- 自製米麴: 一半分量(約 150g)
- 主料白米: 1合(生米約 150g,洗淨、浸泡、蒸熟並完全放涼至 20°C)
- 飲用水: 450ml(生米重量嘅 3 倍,建議用樽裝礦泉水或過濾水)
- Lalvin EC-1118 乾酵母: 0.5g(大約一小撮,約 1/10 茶匙)
- 新鮮檸檬汁: 1 茶匙(極度重要!用嚟調整酸度建立防護罩,抑制壞菌)
- 發酵環境溫度: 12°C - 16°C(全屋最陰涼、無暖氣嘅地方,如走廊或廚櫃底)
- 總發酵時間: 14 - 21 日
詳細製作步驟
1. 工具消毒與酵母活化
- 準備一個容量約 1.5L 至 2L 嘅玻璃樽或發酵罐。將發酵罐、攪拌用匙羹用滾水徹底燙過消毒。自釀最怕雜菌,必須確保所有工具無油無洗潔精殘留。
- 攞一個乾淨小杯,裝 30ml 微溫水(約 30°C),倒入 0.5g 酵母,靜置 15 分鐘,見到表面冒出微細氣泡即代表活化成功。
2. 合體(下罐)
- 喺消毒好嘅發酵罐入面,倒入 450ml 水和 1 茶匙新鮮檸檬汁。
- 加入 150g 自製米麴,以及已經完全放涼至 20°C–25°C 嘅 1 合熟蒸米(摸落去一定要冰涼,過熱會直接燙死酵母)。
- 倒入活化好嘅酵母水,用匙羹由底至上徹底攪拌均勻。
- 鎖緊蓋並裝上氣鎖(Air-lock),或者用保鮮紙包住樽口用橡筋紮緊、再用針喺面頭戳 3-4 個小孔排氣。混合物嘅體積應該只佔罐嘅 4成至5成 左右,必須留一半空間。
3. 爆發期與每日翻攪(第 1 - 3 天)
- 將發酵罐搬去屋企陰涼、照唔到太陽、約 12°C–16°C 嘅低溫環境。
- 頭 24-48 小時內,米粒會將罐入面嘅水全部吸乾,成罐會變到好似無水嘅濃稠稀飯咁樣,唔使驚,呢個係正常現象。
- 每日任務: 在頭 3 天,每天固定時間打開蓋一次,用消毒過嘅匙羹由底至上徹底攪拌 1 分鐘,幫酵母補充氧氣兼讓米粒均勻溶解,攪完立刻重新封好。這時會聽到好響亮嘅「沙沙、啵啵」汽水排氣聲。
4. 低溫靜置發酵(第 4 - 21 天)
- 由第 4 天開始,絕對唔好再攪拌,亦唔好再開蓋。
- 第 4 到 第 10 天是發酵最高峰,氣泡會將米粒推上表面形成厚厚嘅「米浪」,下方液體呈乳白色不斷翻滾。
- 到了第 11-14 天左右,發酵速度慢落嚟。因為米粒內部嘅澱粉被酵母食乾淨,米粒會失去重量並開始全部沉入罐底。
5. 過濾與收成
- 大約到第 14 至 21 天之間,當你發現罐內氣泡完全停止、米粒全部沉底、上半部嘅液體開始由乳白轉為半透明澄清嘅時候,代表發酵完結。
- 用滾水燙過消毒一塊煲湯布或紗布袋,將整罐發酵物倒入布袋,用乾淨嘅手用力擠壓,濾出汁液。
- 濾出嚟乳白色嘅液體就是可以直接飲用嘅清酒(濁酒)。如果想要澄清嘅清酒,將汁液放入密封樽置於 4°C 雪櫃靜置 3 天,等細微米渣完全沉底後,抽取上方清澈、微黃嘅酒液即可。必須放雪櫃冷藏保存。